 Valorant Insights Improve your Valorant Gaming Skills with us!
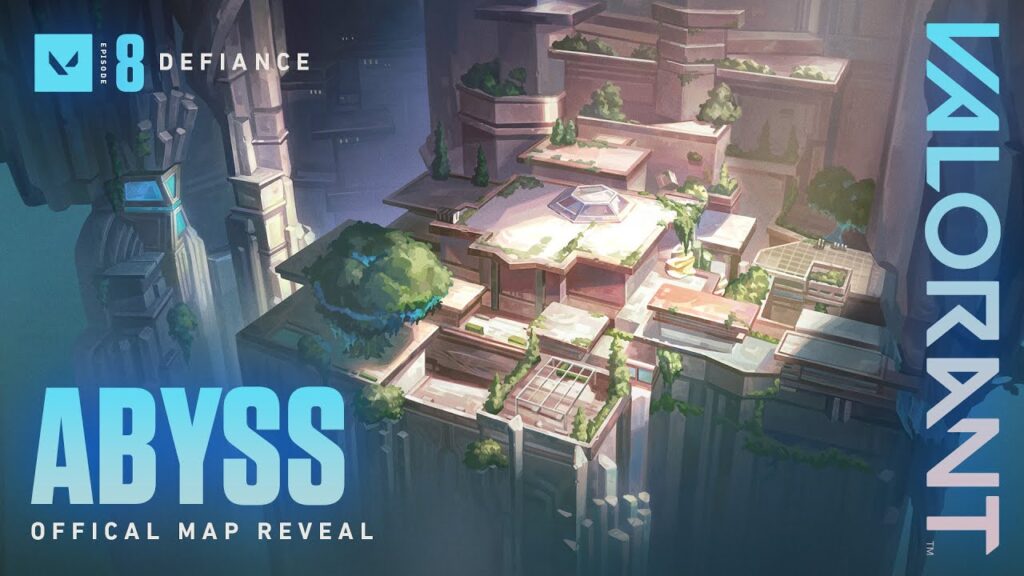
As a Diamond 2 player with over 1,000 hours in Valorant, I’ve experienced the evolution of Riot’s tactical shooter across numerous maps and metas. When Abyss was first revealed, I was immediately intrigued by its unique underwater setting and the strategic possibilities it presented. After countless hours exploring its depths and testing various approaches, I can confidently say that Abyss offers a distinct tactical experience unlike any other map in the rotation.
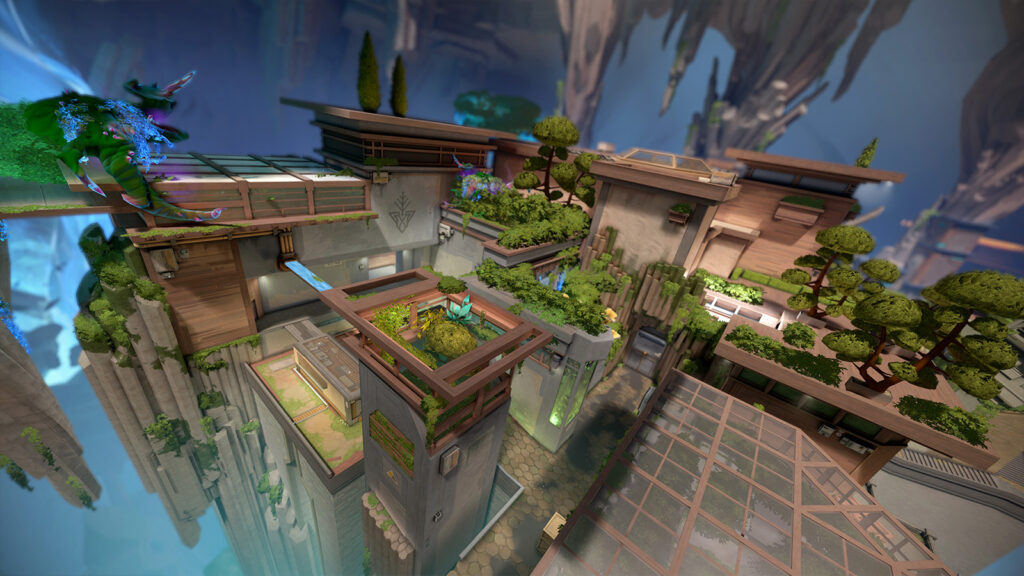
Abyss stands out in Valorant’s map pool with its subaquatic research facility theme, featuring a blend of tight corridors, vertical elements, and open engagement areas. The underwater aesthetic isn’t just visually striking—it fundamentally shapes how players navigate and control space. From the transparent glass tunnels offering long sightlines to the multi-level research chambers creating vertical gameplay opportunities, Abyss challenges players to adapt their strategies to its unique environment.
In this experts guide, I’ll break down everything you need to know about mastering Abyss – from its layout and callouts to advanced strategies for both attacking and defending. I’ll cover optimal agent selections, utility usage, economic approaches, and how the map’s distinctive features influence gameplay. Whether you’re a newcomer who has just created a Valorant account or a veteran looking to refine your approach to this underwater battleground, this guide will equip you with the knowledge to navigate the depths of Abyss with confidence.
Abyss Map Layout and Key Areas
Let’s start by understanding Abyss’s fundamental layout and key areas, as this knowledge forms the foundation for all strategic decisions.
Overall Map Structure
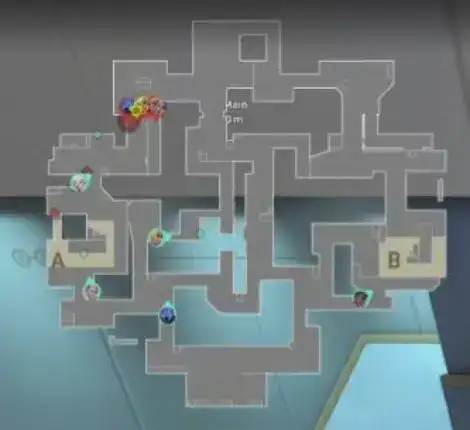
Abyss features a two-site layout with several distinctive characteristics:
- A Site: Located in the eastern portion of the map, featuring a multi-level research chamber with both high and low ground positions
- B Site: Positioned on the western side, designed around a central submersible dock with multiple entry points
- Mid: A complex network of glass tunnels and observation rooms connecting both sites
- Vertical Elements: Significant height variations throughout, creating unique engagement dynamics
- Underwater Aesthetics: Glass walls and floors providing visibility between certain areas
This underwater facility design creates unique strategic dynamics:
- Long sightlines through glass tunnels require careful movement
- Vertical positions offer powerful advantages but limited cover
- Sound propagation differs from other maps due to the facility structure
- Distinct visual elements provide clear callouts and reference points
Key Areas and Callouts
A Site Area:
- A Main: Primary entrance to A site from attacker side
- A Lobby: Area just outside A Main where attackers gather
- Research Chamber: The actual bomb site area with multiple levels
- Specimen Tank: Large central feature providing cover
- Observation Deck: Elevated position overlooking A site
- Lab Entrance: Secondary entrance connecting to mid
B Site Area:
- B Main: Primary entrance to B site from attacker side
- Submersible Bay: Central area of the site featuring a docked vehicle
- Maintenance Tunnel: Lower path into B site
- Control Room: Elevated position overlooking B site
- Pressure Chamber: Defensive position near site
- Dock Connector: Pathway connecting B site to mid
Mid Area:
- Glass Tunnel: Long transparent corridor with extended sightlines
- Observation Hub: Central junction in mid with multiple exits
- Specimen Transport: Moving platform area (unique map element)
- Research Junction: Area connecting mid to A site
- Maintenance Access: Lower path connecting mid to B site
Other Key Areas:
- Attacker Spawn: Where attackers begin each round
- Defender Spawn: Where defenders begin each round
- Deep Storage: Area near defender spawn with rotation options
- Emergency Exit: Alternative path near A site
Unique Map Features
Abyss introduces several distinctive elements that influence gameplay:
- Glass Architecture: Transparent walls and floors create unique visibility dynamics
- Vertical Engagement Spaces: Multiple elevation changes create varied sightlines
- Specimen Transport System: Moving platforms that affect timing and movement
- Water Pressure Doors: Doors with opening/closing animations that create sound cues
- Ambient Underwater Sounds: Background audio that affects sound cue perception
These features combine to create a map that rewards positional awareness, sound cue recognition, and creative angle usage.
Attacking Strategies on Abyss
Attacking on Abyss requires thoughtful approach selection and coordination. Here are comprehensive strategies for successful attacks.
A Site Execution Strategies
A Standard Execute:
- Smoke Placement: Block Observation Deck and Lab Entrance sightlines
- Flash Through Main: Use flashes to blind defenders watching the entrance
- Clear Levels Methodically: Check both high and low positions
- Establish Crossfires: Position to cover multiple angles
- Default Plant: Plant in the common default position while teammates cover
A Split Push:
- Main Group A Main: Apply pressure from the primary entrance
- Secondary Group Lab Entrance: Take mid control and push through Lab
- Coordinated Timing: Execute from both directions simultaneously
- Utility Division: Split utility between both entry points
- Plant Safe: Use the divided attention to secure a safe plant
A Vertical Control:
- Take High Ground: Prioritize control of elevated positions
- Smoke Lower Defenses: Block defender vision from lower positions
- Drop Support: Have players drop to site level when appropriate
- Plant Protected: Plant with high ground players providing overwatch
- Post-Plant Crossfires: Maintain both high and low positions
B Site Execution Strategies
B Standard Execute:
- Smoke Control Room: Block defender vision from elevated position
- Clear Submersible Area: Methodically check corners around the central feature
- Establish Site Control: Secure key positions within site
- Default Plant: Plant in the standard position
- Post-Plant Positions: Hold crossfires covering common retake paths
B Through Maintenance:
- Take Maintenance Tunnel Control: Move quietly through lower path
- Smoke Pressure Chamber: Block defender vision from this position
- Burst onto Site: Coordinate utility and push together
- Plant Safe: Use the unexpected entry to secure a safe plant
- Hold Crossfires: Establish positions covering multiple angles
B Mid Split:
- Secure Mid Control: Establish presence in Observation Hub
- Split Between Dock Connector and Main: Coordinate dual entry
- Utility Convergence: Focus utility from multiple angles
- Trade Effectively: Position for immediate trades
- Post-Plant Depth: Hold deeper positions to counter retakes
Mid Control Strategies
Mid control on Abyss is crucial for enabling flexible attacks:
- Glass Tunnel Control: Take control while minimizing exposure
- Observation Hub Dominance: Secure this central position
- Utility Investment: Use utility to secure mid control safely
- Information Gathering: Use mid control to scout defender setup
- Rotation Flexibility: Maintain the option to hit either site
- Specimen Transport Timing: Use the moving platforms to create timing advantages
Default Setups for Attacking
A strong default setup creates pressure and gathers information:
- 1-3-1 Split: One player A Main, three Mid, one B Main
- Map Control Focus: Take control of key areas without committing
- Information Gathering: Use utility to bait out defender utility
- Adaptation Potential: Be ready to collapse on either site
- Late-Round Execution: Use gathered information for informed late executes
For more insights on agent-specific attack strategies, check out guides like how to use Clove or how to use Tejo for detailed approaches with these agents on Abyss.
Defending Strategies on Abyss
Defending Abyss effectively requires understanding optimal setups and rotation patterns.
A Site Defense Setups
Standard A Defense (2 Players):
- Observation Deck Position: One player holds elevated angle
- Research Chamber Position: Second player plays from site level
- Crossfire Establishment: Position to create complementary angles
- Utility Layering: Use slows, alarms, and other utility to delay pushes
- Retake Preparation: If overwhelmed, fall back to retake positions
A Site One-Player Hold:
- Flexible Positioning: Play from position allowing level changes
- Utility Delay: Focus on slowing the push with utility
- Information Gathering: Prioritize information over engagement
- Rotation Communication: Clear callouts for support
- Fall Back Decision: Know when to give site and play for retake
A Site Aggressive Defense:
- Push A Main: Take aggressive control with flash support
- Gather Information: Identify attack strength and composition
- Utility Disruption: Disrupt attack timing with well-placed utility
- Fall Back Path: Have clear path to retreat if needed
- Delay Focus: Prioritize survival and information over kills
B Site Defense Setups
Standard B Defense (2 Players):
- Control Room Position: One player holds from elevated position
- Submersible Cover: Second player plays around central feature
- Crossfire Establishment: Create complementary angles
- Utility Coverage: Cover B Main and Maintenance with utility
- Retake Coordination: Plan retake positions if site is lost
B Site One-Player Hold:
- Off-Angle Positioning: Hold unexpected angles
- Utility Maximization: Use utility to create multiple threats
- Information Priority: Focus on information over engagement
- Clear Communication: Call enemy movements precisely
- Delay Tactics: Use site geometry to delay pushes
B Site Aggressive Defense:
- Contest Maintenance: Take control of lower entrance
- Utility Disruption: Use utility to break attack momentum
- Information Gathering: Identify attack composition
- Safe Retreat Path: Ensure you can fall back safely
- Rotation Communication: Call for precise rotations based on information
Mid Control Defense
Controlling Mid is crucial for successful defense on Abyss:
- Glass Tunnel Contest: Use utility to control long sightlines
- Observation Hub Control: Maintain presence in this central position
- Vertical Position Usage: Use elevation for information advantage
- Utility Investment: Commit utility to slow mid control
- Rotation Facilitation: Use mid control to enable faster rotations
- Information Gathering: Mid control provides crucial attack information
Rotation Strategies
Effective rotations are essential on Abyss:
- Mid-Based Rotations: Use mid control to enable faster rotations
- Timing Awareness: Understand timing for different rotation paths
- Partial Rotations: Sometimes rotating one player is sufficient
- Utility Usage: Use utility to cover rotations
- Sound Cue Management: Be aware of distinctive sound cues during rotation
For sentinel players looking to lock down sites, our guide on how to use Sage in Valorant offers valuable insights that apply well to Abyss’s defensive requirements.
Agent Selection for Abyss
Choosing the right agents for Abyss significantly impacts your success on the map.
Top Controllers for Abyss
Controllers are essential for managing Abyss’s unique sightlines:
- Omen: Teleport ability excels with vertical elements
- Brimstone: Precise smoke deployment for site executes
- Astra: Global presence valuable for the map’s size
- Harbor: Water-themed abilities thematically fitting and effective for site control
Effective Duelists
Duelists who excel on Abyss include:
- Jett: Vertical mobility synergizes with the map’s elevation changes
- Raze: Satchel movement valuable for navigating levels
- Reyna: Dismiss allows for aggressive plays with escape options
- Yoru: Teleport can create unexpected flanks through glass areas
Valuable Initiators
These initiators provide particular value on Abyss:
- Sova: Recon abilities effective through glass elements
- Fade: Haunt covers significant portions of multi-level sites
- Breach: Fault Line effective through walls and floors
- Skye: Information gathering and flash support
Sentinel Selection
Strong sentinels for Abyss include:
- Killjoy: Setups effective for site control
- Cypher: Camera placement options abundant on glass architecture
- Chamber: Teleport valuable for repositioning between levels
- Sage: Wall creates powerful position denial and level access
Recommended Team Compositions
Based on the map’s characteristics, these compositions work well:
Standard Composition:
- Controller: Omen
- Duelist: Jett
- Initiator: Sova
- Sentinel: Killjoy
- Flex: Second duelist or initiator
Vertical Control Composition:
- Controller: Astra
- Duelist: Jett
- Duelist: Raze
- Initiator: Sova
- Sentinel: Chamber
Information-Focused Composition:
- Controller: Brimstone
- Duelist: Reyna
- Initiator: Fade
- Initiator: Skye
- Sentinel: Cypher
Understanding your team’s composition and how it interacts with Abyss’s layout is crucial for developing effective strategies. Different compositions may require adjustments to standard approaches.
Essential Utility Usage on Abyss
Understanding optimal utility placement is crucial for success on Abyss.
Smoke Placements
A Site Attack Smokes:
- Observation Deck smoke: Blocks elevated position
- Lab Entrance smoke: Cuts off defender rotation
- Research Chamber smoke: Controls central site vision
B Site Attack Smokes:
- Control Room smoke: Blocks elevated position
- Pressure Chamber smoke: Controls defensive position
- Dock Connector smoke: Prevents flanks from mid
Defensive Smokes:
- A Main smoke: Delays initial push
- Glass Tunnel smoke: Controls mid presence
- B Main/Maintenance smokes: Force attackers into predictable paths
Wall Placements (Sage/Harbor)
Attacking Walls:
- A Site level divider: Creates safe plant opportunity
- B Submersible cover: Extends central cover
- Mid Glass Tunnel block: Controls long sightlines
Defending Walls:
- A Main block: Forces attackers through choke points
- B Maintenance block: Prevents lower path access
- Mid Observation Hub division: Controls rotation options
Information Gathering Utility
Attacking Information:
- Sova recon for A Site: Reveals multi-level positions
- Fade haunt for B Site: Covers multiple angles
- KAY/O knife for Mid: Reveals utility-dependent defenders
Defending Information:
- Cypher camera positions: Hidden spots with wide visibility
- Sova recon for push detection: Covers main entrances
- Fade prowlers for flank detection: Controls multiple pathways
Flashes and Blinds
The most effective flash points on Abyss include:
- A Main entry: Flash through the entrance
- B Main push: Pop flash around the corner
- Glass Tunnel control: Flash through transparent surfaces
- Vertical flashes: Flash between levels for site control
- Retake flashes: Coordinate for site reentry
Post-Plant and Retake Strategies
Mastering post-plant and retake scenarios is essential for success on Abyss.
A Site Post-Plant
Default Plant Post-Plant:
- Level Control: Maintain presence on both high and low ground
- Lab Entrance Coverage: Watch for retakes through mid
- A Main Coverage: Monitor the main entrance for retakes
- Crossfire Establishment: Set up complementary angles
- Utility for Common Defuse: Place damage utility on the spike
Safe Plant Post-Plant:
- Deep Position Control: Hold positions with good cover
- Utility Layering: Use damage utility on the spike
- Information Gathering: Deploy recon abilities strategically
- Time Management: Play for time when advantageous
- Crossfire Establishment: Coordinate positions with teammates
B Site Post-Plant
Default Plant Post-Plant:
- Submersible Cover: Use the central feature for protection
- Maintenance Coverage: Watch for retakes through lower path
- Control Room Denial: Use utility to prevent retakes from elevated position
- Crossfire Positions: Hold from multiple angles
- Utility for Common Defuse: Place damage utility on the spike
Safe Plant Post-Plant:
- Deeper Positions: Hold from positions with good cover
- Utility Layering: Use damage utility on the spike
- Information Gathering: Deploy recon abilities strategically
- Time Management: Play the clock when in advantage
- Crossfire Establishment: Coordinate positions with teammates
Site Retake Strategies
Effective retakes on Abyss require coordination and utility usage:
A Site Retake:
- Level Recapture: Retake both high and low ground
- Utility Clearing: Use flashes and recon to clear common spots
- Coordinated Push: Time utility and pushes together
- Multiple Entry Points: Retake from different entrances
- Defuse Protection: Establish positions to protect the defuser
B Site Retake:
- Control Room Recapture: Secure elevated position when possible
- Utility Sequence: Layer utility to clear positions systematically
- Crossfire Breaking: Use utility to break post-plant crossfires
- Coordinated Push: Time pushes from multiple entrances
- Defuse Coverage: Coordinate to protect the defuser
Economic Strategies for Abyss
Understanding map-specific economic approaches improves your consistency on Abyss.
Attack Economy
- Glass Tunnel Risk Assessment: Consider the risk/reward of Operator investment for Glass Tunnel control
- Vertical Position Investment: Prioritize utility for taking high ground on eco rounds
- Save Round Approaches: Use save rounds to gather information on defensive setups
- Force Buy Timing: Consider forcing after winning pistol for momentum
- Ultimate Economy: Certain ultimates like Viper’s or Killjoy’s offer high value on specific sites
Defense Economy
- A Site Economy: One-player A holds can be effective on partial buys
- Mid Investment Priority: Prioritize utility for mid control even on eco rounds
- Retake Economy: Consider saving for retakes when significantly outgunned
- Force Buy Strategies: Forcing with shotguns can be effective in tight spaces
- Ultimate Value Assessment: Certain ultimates offer exceptional defensive value
Operator Economy
The Operator has specific value on Abyss:
- Glass Tunnel Operator: Controls significant sightlines
- Observation Deck Operator: Strong position for defensive Operator
- Control Room Operator: Oversees B site effectively
- Attack Operator Positions: Limited but effective in post-plant
For players interested in maximizing their economic efficiency or tracking spending on skins like the Kitty Valorant Skins or watching for deals in the Valorant Night Market, reviewing your Valorant Purchase History can help identify spending patterns.
The Evolving Meta of Abyss
As a relatively new addition to Valorant’s map pool, Abyss’s meta continues to develop.
Initial Meta Trends
In the early days of Abyss:
- Site Preference: Initial tendency toward B site executes
- Vertical Control: Heavy emphasis on securing high ground
- Glass Tunnel Dominance: Strong focus on controlling long sightlines
- Agent Selection Patterns: Preference for mobility agents to navigate levels
Current Meta Evolution
As players have adapted to the map:
- Balanced Site Selection: More even distribution between A and B executes
- Mid Priority: Increased focus on mid control from both sides
- Utility Innovation: New utility setups for both attack and defense
- Composition Refinement: More specialized team compositions
Professional Play Insights
Observing professional play on Abyss reveals:
- Methodical Approaches: Pros favor structured mid control into site executes
- Vertical Mastery: Sophisticated use of elevation differences
- Post-Plant Setups: Advanced positions utilizing glass architecture
- Retake Coordination: Highly coordinated retake strategies
For the latest on how professional teams like MIBR are approaching Abyss in competitive play, follow our coverage of the VCT 2025 season.
Improving Your Individual Performance on Abyss
Beyond team strategies, individual performance on Abyss can be enhanced through specific approaches.
Map-Specific Aim Training
Improve your aim for Abyss’s unique engagements:
- Vertical Aim Adjustment: Practice adjusting aim for different elevations
- Glass Transparency Adaptation: Train for shooting through transparent surfaces
- Flick Training: Develop flicks for clearing multiple angles
- Level Transition Aim: Practice maintaining aim while changing levels
For detailed aim improvement techniques, check out our Aimbot Valorant guide (focusing on legitimate training methods, not cheats).
Movement Optimization
Effective movement on Abyss involves:
- Level Transitions: Practice smooth movements between elevations
- Silent Movement Paths: Identify paths for quiet rotations
- Glass Avoidance: Learn paths that minimize exposure through glass
- Specimen Transport Timing: Master the timing of moving platforms
Sound Cue Awareness
Abyss has unique audio considerations:
- Underwater Ambience: Adapt to the background audio environment
- Pressure Door Sounds: Learn the distinctive sounds of doors
- Level Transition Audio: Understand how sound travels between levels
- Glass Surface Footsteps: Recognize the unique sound of movement on glass
Minimap Usage
Optimize your minimap usage for Abyss:
- Vertical Awareness: Note elevation differences on the minimap
- Glass Area Caution: Be extra vigilant when minimap shows teammates in glass areas
- Rotation Timing: Use minimap to time rotations perfectly
- Enemy Spotting: Call out enemy positions seen on minimap
Communication and Callouts
Effective communication is crucial on a complex map like Abyss.
Essential Callouts
Master these critical callouts for clear communication:
- Precise Location Callouts: Use specific terms like “Observation Deck,” “Submersible,” etc.
- Level Indicators: Specify “High” or “Low” for multi-level areas
- Glass Area Callouts: Clearly identify when enemies are visible through glass
- Enemy Utility Callouts: Call out significant enemy utility placement
- Damage Information: Communicate damage dealt to enemies
Rotation Calls
Clear rotation communication includes:
- Timing Calls: Indicate how quickly you can rotate
- Path Selection: Communicate which route you’re taking
- Support Requests: Call for utility support during rotations
- Enemy Rotation Calls: Share information about enemy movements
- Specimen Transport Status: Call out platform positions when relevant
Post-Plant Communication
Effective post-plant calls include:
- Position Reporting: Share your post-plant position and level
- Enemy Location Updates: Communicate spotted enemies
- Utility Status: Report available utility for defuse denial
- Time Awareness: Call out time remaining at key intervals
- Defuse Sound Alerts: Call out when you hear defuse sounds
For players looking to improve their team communication, joining Valorant Discord communities can help you find teammates to practice with.
Abyss Across Different Skill Levels
Abyss plays differently across the Valorant ranks, and understanding these differences can help you adapt your approach.
Iron to Silver Strategies
At lower ranks:
- Level Confusion: Less understanding of vertical positioning
- Glass Tunnel Overexposure: Excessive peeking through transparent areas
- Basic Site Executes: Simple rushes without level control
- Defensive Overcommitment: Defenders often overcommit to sites
- Limited Mid Control: Less emphasis on mid area control
Gold to Platinum Approaches
In mid-tier ranks:
- Improved Vertical Play: Better understanding of level advantages
- More Methodical Executes: Coordinated utility usage
- Glass Area Awareness: More careful movement through transparent sections
- Faster Rotations: Defenders rotate more efficiently
- Mid Control Value: Greater emphasis on mid control
Diamond to Immortal Tactics
At higher ranks:
- Advanced Level Control: Sophisticated use of elevation differences
- Glass Architecture Exploitation: Creative use of transparency for information
- Specimen Transport Timing: Strategic use of moving platforms
- Rotation Mindgames: Fake rotations and rotation baiting
- Utility Optimization: Precise utility placement for maximum effect
Radiant and Professional Play
At the highest level:
- Perfect Level Management: Flawless control of vertical positions
- Glass Visibility Mastery: Expert understanding of visibility through transparent surfaces
- Specimen Transport Integration: Moving platforms incorporated into strategic timing
- Flawless Coordination: Precise timing of executes and retakes
- Map-Specific Compositions: Highly specialized agent selections
Understanding these differences can help you develop strategies appropriate for your current rank and prepare for the challenges of higher-level play.
Adapting to Abyss on Different Platforms
With Valorant Console development underway and questions about Valorant crossplay emerging, it’s worth considering how Abyss might play differently across platforms.
Console Considerations
When Abyss becomes available on console:
- Vertical Aim Challenges: Level changes may be more difficult with controller aim
- Glass Visibility Adaptation: Transparent surfaces might require different visual settings
- Button Mapping Optimization: Create efficient layouts for level navigation
- Visual Clarity: Adjust visual settings for optimal underwater visibility
Crossplay Implications
If crossplay becomes available:
- Input Method Advantages: Understand which positions favor different input methods
- Communication Integration: Adapt to cross-platform communication tools
- Pace Differences: Adjust to potentially different pace of play
- Mixed Lobby Strategies: Develop approaches that work with mixed input teams
Conclusion: Mastering the Depths of Abyss
Abyss represents one of Valorant’s most innovative map designs, offering a truly unique tactical environment that tests players’ adaptability and spatial awareness. As a Diamond 2 player who’s invested significant time in understanding this underwater battleground, I’ve found that success on Abyss comes from embracing its distinctive features rather than trying to apply standard approaches from other maps.
The key to mastering Abyss lies in understanding its vertical dynamics, glass architecture, and unique sound environment. For attackers, the ability to control multiple levels while managing exposure through glass areas is paramount. For defenders, establishing crossfires between levels and using the underwater facility’s architecture to create unexpected angles can make the difference between victory and defeat.
What makes Abyss particularly rewarding is how it challenges conventional Valorant wisdom and rewards creative thinking. The transparent surfaces create visibility dynamics not seen on any other map, while the vertical elements force players to constantly consider positions above and below them. Whether you’re executing a perfectly coordinated multi-level site take, defending from an unexpected underwater angle, or navigating the specimen transport system for a perfectly timed flank, Abyss offers endless opportunities for tactical innovation.
As you continue your journey through the depths of this underwater facility, remember that map knowledge is only the beginning. True mastery comes from applying this knowledge creatively, adapting to the ever-evolving meta, and coordinating effectively with your team. Whether you’re just starting out or looking to refine your approach at higher ranks, I hope this guide has provided valuable insights that will help you turn Abyss into one of your strongest maps.
Good luck in your underwater adventures, and perhaps I’ll see you in the depths of Abyss!
– Jackober, Diamond 2 Valorant Player


2 comments
Pingback: VCT EMEA 2025 Stage 1: Analysis of Europe's Premier Valorant Competition - Valorant Insights
Pingback: How to Use Yoru in Valorant: Master the Dimensional Trickster - Valorant Insights